Tuesday, May 23, 2017

Designing a fabric box: the process


Hello!

Letting you know that my new posts are now always been published in my website! 

Today I posted about the process when I'm designing a new piece, planning for the kits and instructions! 

So, this new blog post, that is full of great content and fun is there! Please check it out here! 

I hope to see you there!!

Have a great day!

Claudia

Thursday, February 16, 2017

NEW! Fiber arts on Cartonnage


Hey everyone! 

Letting you know that I got a new website that also includes my blog! So, this new blog post, that is full of great content and fun is there! Please check it out here! You will love to see what I have been making with hand painting, hand dyeing and some more things on fabric!!

I hope to see you there!!

Have a great day!

Claudia

Tuesday, January 31, 2017

Combining engineering, chemistry and arts!! How fun!!


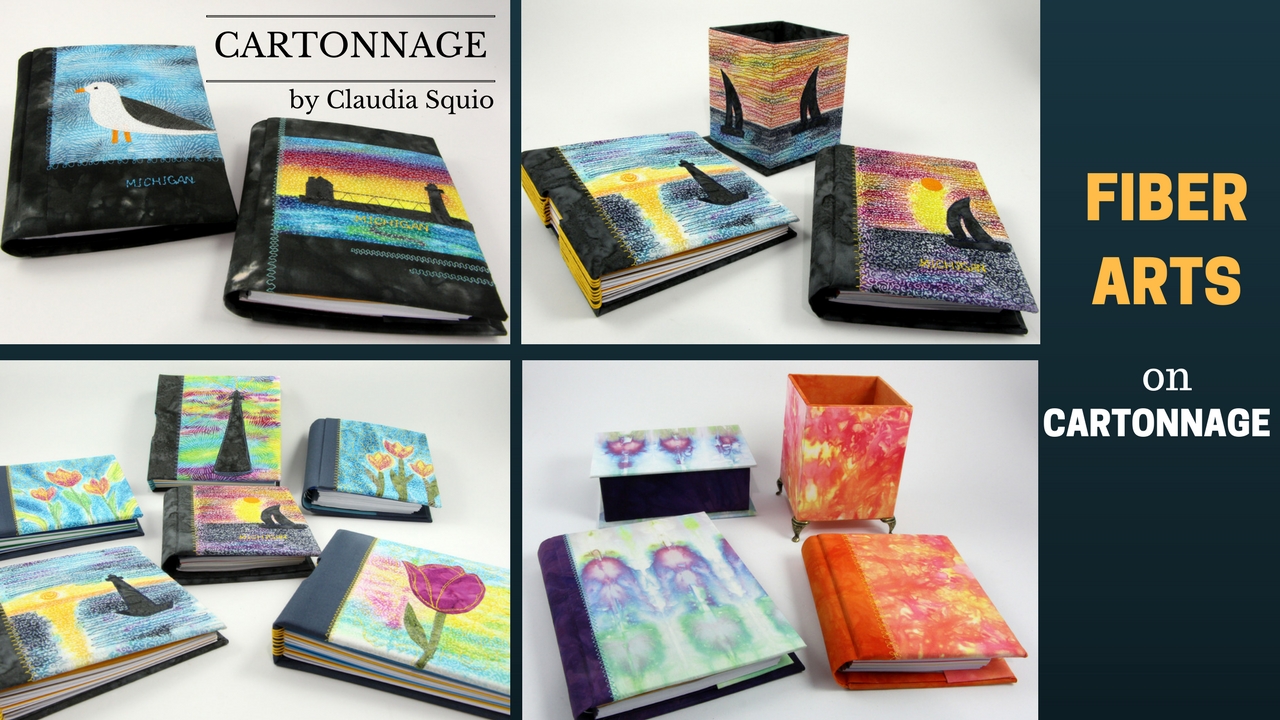
I have been making cartonnage boxes and cases for a few years and I am so happy with the projects I have made… I started with simple ones, just a few pieces of cardboard, paper and fabric and I made beautiful journal covers, hinged lid boxes and more. Then I started getting more and more excited about this technique and all the possibilities of shapes and sizes of boxes I could make.  Since then I have made several different boxes, suitcases, cases….. wonderful unique pieces that I am so proud of have made them!  Plus have been teaching  this technique for hundreds of students in in-person and online classes have been making my life so full of purpose and happiness!

You may know, maybe not, but when living in Brazil before moving to the US in 2012, I was a food engineer….yeah! I worked with food companies, restaurants for about 12 years, but at the time we moved here, I wasn’t happy with my profession and I decided that moving to here, I was not just changing the place I was living, but I would be also changing my work and my life.... And I did!! And  I am so happy I did it!  I always loved arts and crafts and so when I discovered Cartonnage I fell in love with this amazing craft and couldn’t stop anymore…. I found my new work: a crafter, a teacher, a cartonnage designer! 

Well, my husband laugh and says that at least my engineer course is helping me now to build the boxes….and he is not totally wrong…. May be all the  knowledges I have learned in college and in my previous work help me when designing new pieces, some projects have 30 or more pieces that need to fit perfectly…. 
  
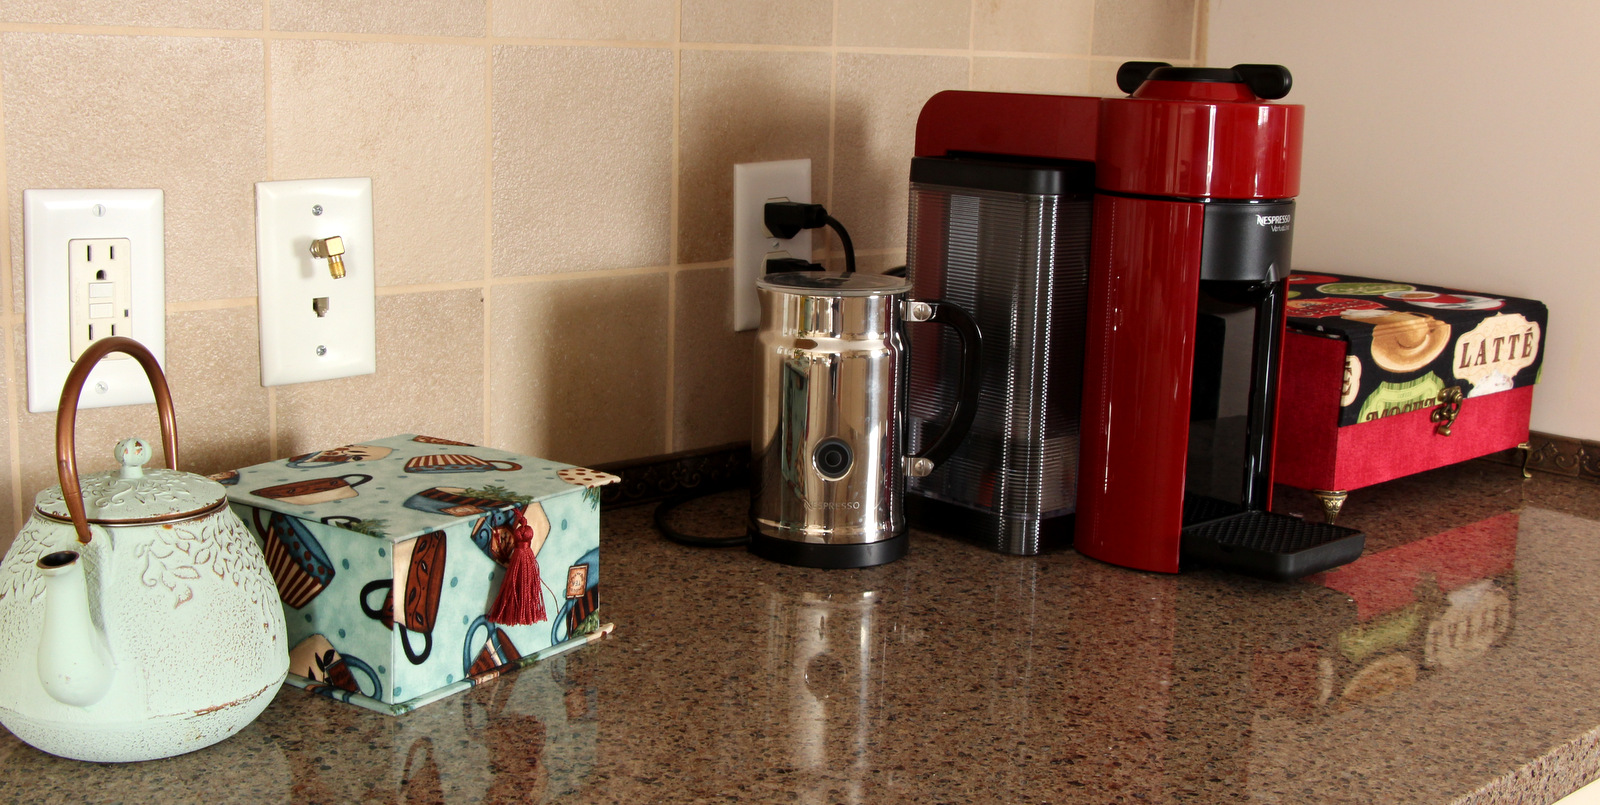
Until last year I was always using commercial fabrics in all my boxes and cases. So many wonderful patterns we have in great quilt stores.  But then……the artist inside me starting thinking and missing some arts I used to make in my earlier years…. I have painted towels, glass, plaster and used to have so much fun around the paints…. So, one idea started to come in my mind frequently….. why not try to paint my own fabric for my cartonnage projects?...... start with white fabric and make everything??

Then, I decided to start learning how could I do that! At this point, I have watched many videos in the internet, so many wonderful ideas there, but not sure what to do.  In the same time I met a great talented fiber artist in Indiana, Lynn Hodge,  and her love for paints and fabrics make me be totally sure I would find my way to paint my fabric! So, I made some tests, trying to find my style in painting and also the best way to apply them to my projects, because, more than paint I also want to do more…. I also like to sew (not very talented in this though, but with practice I will be better), and adding some stitches, free-motion quilts could improve even more my projects and give me even more pleasure making it!

Let me make this clear, I am not trying to totally change my work,  I will continue making new cartonnage projects and using some gorgeous commercial fabric, but this new idea is to fill my inner artist spirit with more joy and why not maybe to inspire others??

This January was very special for me, with this cold weather up here in Michigan, some snow outside, I took the time for myself, to try, to learn, to try again, to have fun…… and I am so happy with my results so far, that I want to share some of them with you! I hope you like my journey that is just starting……

Today I am gonna tell you about one course I took this weekend and what I made from there!  I have other pieces I made using another techniques to paint, but I will share in the next post, as I want to make some more to combine more ideas into that technique.

So, let’s talk about turning white fabric into amazing designs using hand dyeing!  I took this class at Smith-Owen Sewing and Quilting store with this great teacher SueCortese, from SELC fabrics. I have tried dyeing other times, but taking a class changed everything….. so, now I am aware of what and why to do! And here is the point that chemistry arrive again in my life.... During the class I was feeling like when I was in my  chemistry labs during my college and master….. so fun!  Dyeing is totally chemistry!  The reaction between the fabric, the dyes and activator will create beautiful designs! Loved!  Take a look at some pictures during the class……


Sue taught us how to have different gradient of  the same colors, how to mix colors, and other fun ways to dye the fabrics. Here is the final result of the fabrics after washing and drying….. I am amazed with them!!


Now, the ice dyeing...they are my favorite, for sure! It's amazing how unpredictable they are! We will always have a surprise when ready! 


Of course, I couldn’t wait long to make some projects with those great fabrics! So, here are some pictures of me making the boxes and cases and the pieces ready! Oh boy, I can’t believe in my eyes!  So many new ideas and possibilities in my mind now……. How fun! How unique!!!


We have a good amount of snow outside now and then…..guess what? Already made new fabrics using the snow dyeing technique!  


And the final pieces……totally NOT FOUND IN STORES!!! Unique!! Looking forward to make some new projects!!


That’s what I want to share with you today! I hope you liked it! I can tell you that I am having so much fun!  Next week I am planning to share another technique combining hand painting, hand dyeing, fabric applique and free motion quilt!

See you!  Have fun!!

Claudia


Monday, December 19, 2016

One special customer helped me designing this beautiful and functional box!

This year I was busy with my classes, online videos, preparing instructions, DIY kits, moving….. so, it was  a long time since I made one new project! And then, this Saturday I did…  and I got help to make it! It was a great project and working with this special customer ….. actually….my husband…..was a great additional to the project!  Take a look what we did!!


First, he loves coffee and decided to have a new coffee machine for our house! After searching he found the best choice would be the Nespresso  Vertuoline. He started making very good coffees, but the capsules were kind of big to fit in the boxes I already made, and for sure, I didn’t want to buy a new one, as I could have fun and make my own one by Cartonnage! But I didn’t want to make just “another box”, I want to make something functional and beautiful! But I didn’t have time for that….then, for the last two weeks, my countertop was a mess……literally….  Some weird boxes around, so difficult to find the coffee he wanted...


but I knew I had to have plenty of time to stop and make a new one! And last Saturday was snowing…..very cold outside in the morning, so,  perfect to be inside and I said, let’s do it….today I will solve this problem!

And to get started, I asked him (the customer!): What do you want? What kind of box do you want? How many capsules do you want to fit inside? Do you want closure?... And he just said he wants a box like the other ones I make, no closure, and then, he started helping me with the design…..we tried to figure out the best size for the box…..
So, I made some notes, cut some chipboard,  quickly build one temporarily box and we had our first test!

Decision: too big….. it would fit 25 capsules but would be a big box…. So, we play a little bit with it and decided that may be would be better have space for 20 capsules on top and one extra storage under that to keep more capsules as they come in the packages….. 


So,  a little bit more conversation and I made another temporarily box.


But…. this time, we thought that would be better if I add dividers to the top tray…. and then, more measures and I had to cut more chipboard for a box a little bigger….. and make another box and this time…..yeah…. all fit perfectly and it was starting to look like something functional !!


So, now it was my time to cover all pieces of paper with fabric and make the tray. 


And then…. the final test for the tray! Perfect! 20 capsules in perfect place!


Ok, then, it was time to make the box to put the tray inside and more space for storage underneath.  More math, cutting paper and build another temporarily box to check the dimensions…..


My first idea was to add some ribbon on the sides of the tray to remove it from the box, then I decided to make some holes in the sides of the box instead, and with those, we can easily remove the tray. All paper cut by hand and sanded when needed!


Looks like will fit everything….  At this time, I wasn’t sure yet how I would close the box….still thinking…..

Then I covered the pieces of chipboard with fabric and build the box. When finished my husband  figured out that if I had made a box just a little higher we could storage the packages, but then we decided to continue like that and keep our first idea, it will be easier to access the capsules without the package…. Glad we decided that!! 


So, we will have space for 4 or 5 of these things with capsules with 10 capsules each, plus 20 capsules on the top tray, so, at the end, the box will fit 60 or 70 capsules (because the espresso ones are smaller)… that’s a great storage  (we can buy more capsules each time with discount, free shipping and have space for them!!)


At this point the designing was finished! My husband went outside to play with the kids and I continued my work making the box……oh….so fun…. I love my craft time!!


Then, I decided about the lid, the fabrics, made the lid, covered the tray and box outside (because inside was already covered when I build the box).


 At some point, I also made a break and came outside to take some pictures and play a little bit with my family! We all love snow!

So, at the end of the day I was with the box ready, or at least almost! I knew my husband didn’t want a closure, but I thought that it is a beautiful box, that deserves something more….. so, my plan was for a closure and feet (but I didn’t tell him about that until he saw the final box in the next day!....)


You may know, may not, but in cartonnage, we use masking tape as part of the process and we need to wait some hours to remove it…..for sure….not easy time to pass …… I was so curious to see the final box…but, I put something heavy over and kept like that until next day, Sunday!

Then, on Sunday, I removed all the masking tape, and I can tell you that it is an exciting time….when you start seeing your project done….. 


and then, the final step, I added the metal feet! 

Finally, I was able to see the box ready!! 

OMG….. I loved so much!! I can’t believe I made it! I love Cartonnage so much! It is such a great craft!!

Then, it was time to give the box to my husband….. He also loved  (didn’t complain about the closure and feet!! Yeah…..)  and he was so happy with it! Now he can find the coffee so easily!


And I was also happy with the box and with the organization of my countertop! Yeah….. no more weird boxes on it!


So, that was my project for the weekend! I loved so much! I enjoyed designing with help of my husband! I loved the final box and I had so much fun making it……


I hope you liked as well! I would love to hear from you!

Making boxes out of paper, fabric and glue it’s called CARTONNAGE, it is so fun! If you want to learn more about it I have one basic FREE online course where you can start learning this craft with simple projects, and also I have other online courses where you can learn how to make fabric boxes, journal covers and one special treasure box! Local classes in Indiana and Michigan are available sometimes and you can check the calendar here.

I loved  this new box so much, that I am planning to make a similar one but a little smaller to be a jewelry box! I think will be a great idea! And then….. I will solve the organization of my daughter’s bedroom!!....And why not another one for my sewing notions?? ....But for now, I will take a break for the Holidays! I wish you and your family a Merry Christmas and a wonderful New Year!!

See you!!

Claudia